CentOS 5.4 基于HP Proliant DL380 G5服务器配置Modular Smart Array 1000存储
原来单位的存储一直是分两个800G的区,挂在到Windows下。Windows的系统总要担心病毒,所以打算迁移到CentOS Linux下。
参考了http://blog.s135.com/post/415/这篇文章,但是他的文章里是单控制器,并且没有用到光纤。所以配置上有些不同
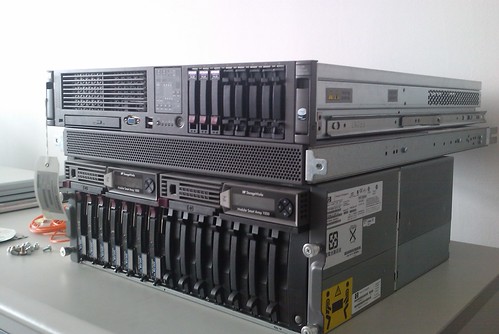
硬件配置
- 一台HP MSA 1000存储设备(包含两个Modular Smart Array 1000控制器)
- 一台HP Storage SAN 4/8光纤交换机
- 一台HP Proliant DL380 G5 2U服务器
- 七块SCSI 300G硬盘
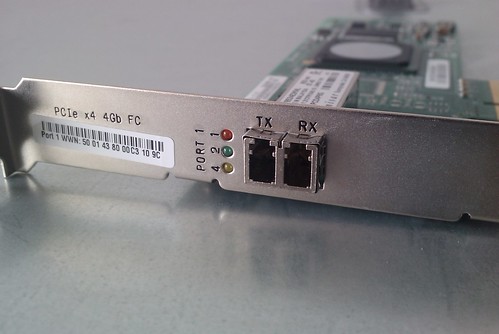
- 一块HP StorageWorks FC1142SR 4GB PCI-E 光纤卡
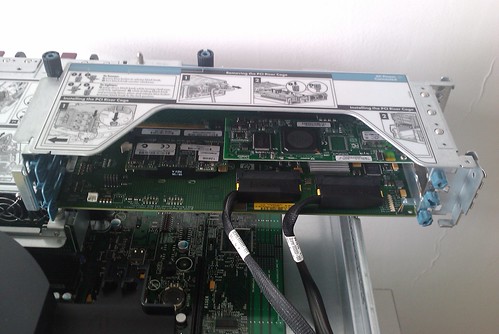
从两个Modular Smart Array 1000的控制器后面连接光纤到光纤交换机。然后将光纤卡安装到服务器上,用光纤连接光纤卡到光纤交换机。
软件配置
先对各种硬件的fireware进行下更新。
从惠普网站下载update fireware光盘,下载的文件为firmware-8.60-0.zip,大小463M左右,然后解压刻成光盘
下载地址ftp://ftp.hp.com/pub/softlib2/software1/cd/p1040529012/v53483/firmware-8.60-0.zip
用光盘启动服务器,然后安装提示做就可以。它会更新网卡、服务器等设备的fireware。都是自动检测并更新的,很简单
确保各种fireware都更新后,下面需要用到smartstart光盘来对存储进行配置了
从惠普网站下载smartstart光盘,下载的文件smartstart-8.30-0-x86.zip,大小576M左右,也是解压刻录光盘
下载地址ftp://ftp.hp.com/pub/softlib2/software1/cd/p1040463476/v49882/smartstart-8.30-0-x86.zip
然后用光盘启动服务器,按照提示进入后,选择第2项配置存储卡,第一项是用来安装操作系统的,我发现没有Linux的操作系统。。。都是Windows系列。
可以发现服务器自己的raid卡 HP Smart Array E200和MSA 1000存储。
我是先将服务器的3块硬盘组成一个Raid 5,然后再配置MSA 1000的存储,也是将7块盘组成Raid 5。我看了下资料,说raid 6比raid5要损失8%-15%的性能,但是可以保证同时坏2块盘不丢失数据。不过我觉得raid5够用了。
因为是双控制器,我这里的fireware是4.48所以采用的是active/standby模式。如果打算用active/active模式,需要更新fireware到7.0版本
用smartstart光盘做好raid后,就可以给服务器安装系统了。
安装CentOS 5.4 64bit
安装CentOS 5.4 64bit版本前,先将连接到服务器的光纤拔掉,要不系统总是提示/dev/sda不可读取,这里的sda就是我们存储。 一切安装正常安装就可以。
正常安装后,连接好光纤,再启动服务器。
这个时候因为没有安装驱动,服务器在启动过程中会报很多end_request: error
而且我还发现如果不安装驱动,我们可以通过fdisk -l查找到存储设备,但是每次重启或者存储关机再开,存储的设备名都会变,有时候是/dev/sda有时候是/dev/sdb。所以很难在/etc/fstab里写入mount的配置。
安装HBA卡驱动
也可以直接下载 ftp://ftp.hp.com/pub/softlib/software10/COL19426/co-74973-1/hp_qla2x00-2009-03-17.tar.gz
ftp://ftp.hp.com/pub/softlib/software11/COL28061/co-69719-3/hp-fc-enablement-2009-12-16.tar.gz
上面两个文件,一个是qla2x00的驱动,后面一个是Linux fibre channel enablement kits for QLogic HBAs and mezzanine cards
下载后解压安装
Installation instructions

Download the appropriate driver kit for your distribution. The driver kit file will be in the format hp_qla2x00-yyyy-mm-dd.tar.gz.
Copy the driver kit to the target system.
Uncompress and untar the driver kit using the following command:
# tar zxvf hp_qla2x00-yyyy-mm-dd.tar.gz
Change directory to the hp_qla2x00-yyyy-mm-dd directory.
Execute the INSTALL command.
The INSTALL command syntax will vary depending on your configuration. If a previous driver kit is installed, you can invoke the INSTALL command without any arguments as the script will use the currently loaded configuration:
# ./INSTALL
To force the installation to failover mode, use the -f flag:
# ./INSTALL -f
To force the installation to single-path mode, use the -s flag:
# ./INSTALL -s
Use the -h option of the INSTALL script for a list of all supported arguments. The INSTALL script will install the appropriate driver RPM for your configuration, as well as the appropriate fibreutils RPM. Once the INSTALL script is finished, you will either have to reload the QLogic driver modules (qla2xxx, qla2300, qla2400, qla2xxx_conf) or reboot your server.
The commands to reload the driver are:
# /opt/hp/src/hp_qla2x00src/unload.sh
# modprobe qla2xxx_conf
# modprobe qla2xxx
# modprobe qla2300
# modprobe qla2400
The command to reboot the server is:
# reboot


CAUTION: If your boot device is a SAN attached device you will have to reboot your server.

To verify which RPM versions are installed, use the rpm command with the -q option.
For example:
# rpm -q hp_qla2x00src
# rpm –q fibreutils
然后在继续安装HP Fibre Channel Enablement Kit
Installing the HP Fibre Channel Enablement Kit

To install the HP Fibre Channel Enablement Kit, do the following:
Download the hp-fc-enablement-yyyy-mm-dd.tar.gz file for your operating system and copy it to the target server
Untar the enablement kit by executing the command to create the directory, hp-fc-enablement-yyyy-mm-dd.
# tar zxvf hp-fc-enablement-yyyy-mm-dd.tar.gz
Browse to the directory hp-fc-enablement-yyyy-mm-dd.
Do one of the following to execute the install.sh script.
If you are not using Device Mapper multipathing execute the following command:
# ./install.sh -s
If you are using Device Mapper multipathing execute the following command:
# ./install.sh -m
The hp-fc-enablement and fibreutils RPMs should be installed once this install completes. To verify the installation, enter the following commands:
# rpm -q hp-fc-enablement
# rpm -q fibreutils

NOTE: For use with the driver that comes with the kernel you will need fibreutils 3.x or greater.
全部完成后,我们需要查看下/etc/modprobe.conf 如果有下面图中标记的一些信息加入,说明上面的驱动安装正确。

确实正确后,我们重启下服务器。
当再次进入系统后,我们的存储应该被识别为/dev/sda设备
用fdisk -l /dev/sda查看下,如果没有问题了,就可以使用fdisk /dev/sda进行分区
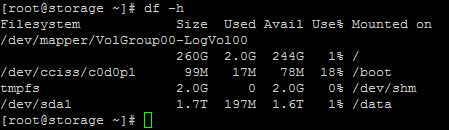
我是把全部1.6T分成一个区/dev/sda1
然后e2lable /dev/sda1 /data给卷标
在/etc/fstab文件里加入/dev/sda1的挂着位置
这样以后每次启动系统,就自动将存储挂着到系统的/data目录中了。如下图
总结
本来参考http://www.s135.com博主的文章配置的,后来发现因为用了光纤卡,不安装驱动会有问题。还有就是双控制器的active/active和active/standby模式需要通过刷新不同的fireware实现。总得来说这个存储配置起来不难,安装官方文档和网络上一些文档就可以。写这篇文档就是为了记录下自己的配置过程,省的以后再配置还要到处找文档查资料。